Handwritten Recipe Cards to a Cookbook, Step by Step
The best family cookbooks keep the cards. Not just the recipes typed out, but the cards themselves, stains and all, because the handwriting is half of what people want to keep.
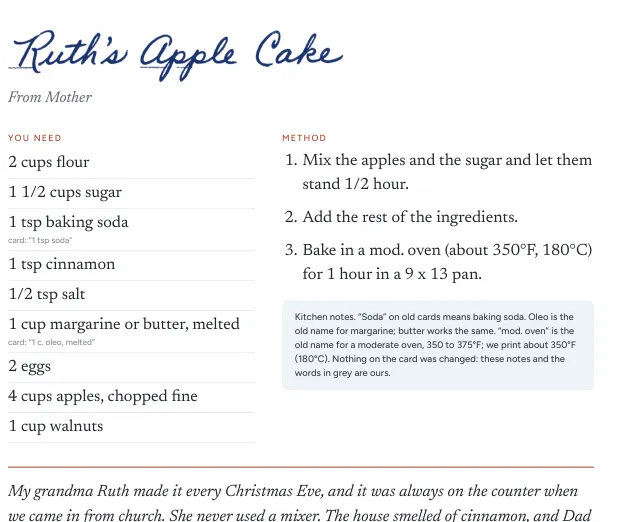
The layout that works: card on the left, recipe on the right
Open the book and you see a spread. The left page holds the original card, flattened and cleaned but never redrawn. The right page holds the recipe set in clear type, so anyone can cook from it. The title on the right is her own handwriting, lifted off the card.
This layout solves two problems at once. Old cards are hard to read in a hot kitchen, so the typed page is what you cook from. And typing loses the person, so the card stays right next to it. If a word was misread, the card on the facing page shows what she really wrote.
Step by step
- Gather the cards. Ask relatives for theirs too. Keep each card with any notes clipped to it.
- Photograph them. Flat on a table, near a window, phone held straight above. Daylight beats a flash, which leaves a white spot. Fill most of the frame with the card.
- Transcribe. This is the slow part by hand. In Cookbook Maker a reading model types each line and marks the words it is unsure of, and you check only those.
- Explain the old words. Cards say “oleo”, “soda” and “bake in a mod. oven”. Add a note instead of changing her words: oleo is margarine, a moderate oven is about 350°F.
- Add a line of story. Who made it and when you ate it. Two or three sentences are enough, and they are what people read first.
- Lay out and print. Chapters, contents, an index and page numbers. Then a print file that a print service accepts.
Getting a good photo of an old card
- Use the back camera, not the selfie camera.
- Lay the card on a plain surface that is darker or lighter than the card, so its edges are easy to find.
- Hold the phone parallel to the table. A slight angle is fine, we straighten it, but a steep angle blurs the far end.
- For faded pencil, turn off the flash and move closer to the window.
- Two-sided card? Photograph the back too. The workspace asks when a card stops mid-sentence.
Keep the stains
A butter spot on the apple cake card tells you which recipe was made most. We even out the light and deepen faded ink, but stains, tears and creases stay. If you want the card exactly as it looks, choose “Keep everything” in the card’s settings.
Her handwriting as the titles
The title line of each card is cut out of the photo, ink only, with the printed lines removed. It becomes the recipe title in the book. When the book is called after her, like “Ruth’s Kitchen”, her own “Ruth’s” heads the title page. A small or blurry photo prints the handwriting smaller, so it stays sharp.
Start with one card. The first spread is ready in about a minute.
Photograph a recipe card